The Lofoten Islands, an archipelago located within the Arctic Circle, represent one of the most geographically dramatic regions in the Northern Hemisphere. Characterized by jagged granite peaks, deep fjords, and turquoise-water beaches, the islands offer a unique intersection of dramatic light and maritime culture. For photographers, the region is a primary destination for capturing large-scale landscapes, the aurora borealis, and the “Midnight Sun,” all within a relatively compact geographical area.
This guide provides a neutral, long-form examination of the Best Guided Photography Tours in Norway’s Lofoten Islands. Readers will learn about the structural differences between winter and summer expeditions, the logistical requirements for Arctic travel, and the practical considerations regarding equipment and safety. By focusing on the professional standards of the photography tourism industry, this article serves as a foundational resource for individuals planning a high-level creative expedition to Northern Norway.
Overview of Best Guided Photography Tours in Norway’s Lofoten Islands
The core concept of a guided photography tour in Lofoten is “Logistical and Technical Optimization.” Because the weather in the Norwegian Sea is notoriously volatile, a professional guide functions as both a driver and a meteorologist, navigating the micro-climates of the islands to find the best light. Unlike standard sightseeing trips, these tours prioritize “Blue Hour,” “Golden Hour,” and nighttime aurora hunting, often involving unconventional schedules to capitalize on celestial events.
Commonly, travelers approach these tours to gain access to remote vantage points—such as the Reinebringen crest or Uttakleiv Beach—at times when the light is most conducive to high-resolution captures. The goal is typically to produce a professional-grade portfolio while learning advanced techniques like long-exposure, focus stacking, and panoramic stitching. The outcome of participating in the Best Guided Photography Tours in Norway’s Lofoten Islands is a balance of specialized education and access to the most iconic vistas in the Arctic.
Key Categories and Seasonal Approaches
Photography tours in Lofoten are primarily dictated by the solar cycle. The experience of the islands changes fundamentally between the dark winter and the light-saturated summer.
| Category / Type | Description | Common Use Case | Time / Cost / Effort Level |
| Aurora Expeditions | Night-focused tours during the dark months (Sept – April). | Capturing the Northern Lights. | Moderate / High / High |
| Midnight Sun Tours | 24-hour daylight tours (Late May – July). | Soft, low-angled light for landscape. | Moderate / Moderate / Moderate |
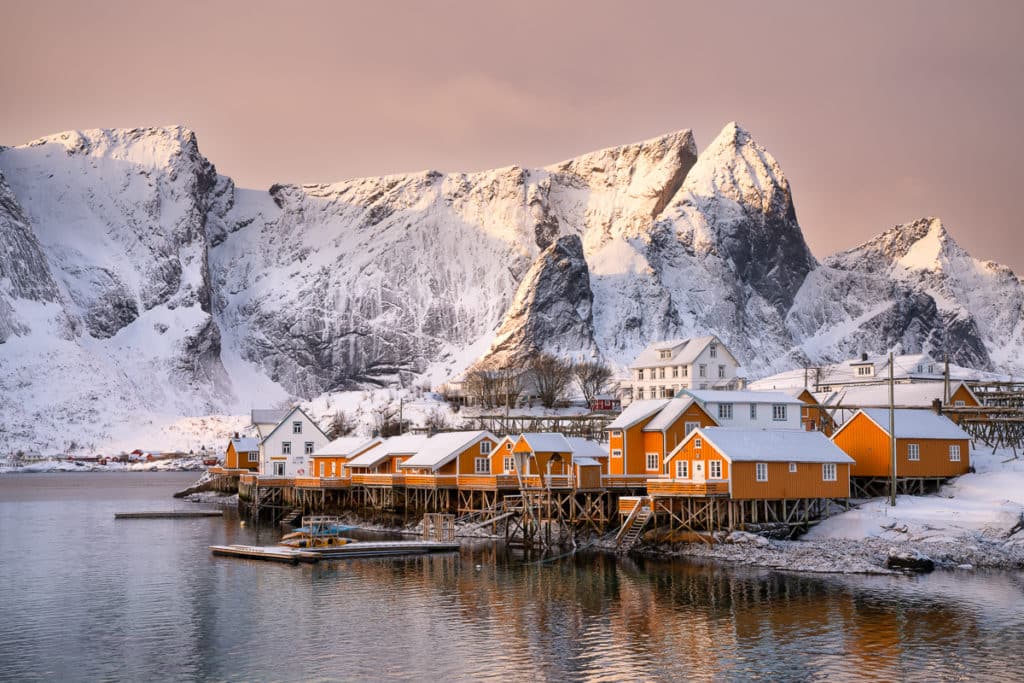
| Winter Arctic Light | Focused on the blue light and snow of Jan – March. | “Stockfish” drying racks and snow peaks. | Moderate / High / Very High |
| Workshop-Style | Intense education with indoor post-processing sessions. | Improving technical editing skills. | High / Exceptional / High |
| Private Guided | One-on-one custom itineraries. | Specific species (Sea Eagles) or peaks. | Variable / Exceptional / Variable |
Choosing between these categories depends on the desired subject matter. Winter tours require more physical resilience due to sub-zero temperatures and icy terrain but offer the rarest light conditions. Summer tours provide more comfort and the ability to hike to higher elevations for panoramic shots.
Practical Scenarios for Photography Expeditions
Scenario 1: The Winter Aurora Hunt
This scenario focuses on the technical challenges of nighttime photography in a frozen coastal environment.
-
Steps: Daily review of the KP-index and cloud cover maps; transit to a north-facing beach (e.g., Skagsanden); setup of sturdy tripods in high winds; use of fast (f/2.8 or wider) lenses.
-
Elements: Frozen tide pools, green/purple light ribbons, and traditional red “Rorbuer” cabins.
-
Location: Flakstadøya and Moskenesøya.
-
Relevance: This is the most iconic Lofoten use case, requiring a guide who understands both solar physics and safe night-driving on icy roads.
Scenario 2: The Midnight Sun Landscape
Utilizing the “infinite golden hour” to capture the coastline without the pressure of a setting sun.
-
Steps: Departure at 10:00 PM; hiking to a coastal overlook; shooting from midnight to 2:00 AM while the sun hovers at the horizon; return for rest during midday.
-
Components: Polarizing filters, graduated ND filters, and lightweight trekking gear.
-
Location: Værøy or the beaches of Gimsøy.
-
Relevance: This scenario maximizes shooting time and is ideal for photographers who want to avoid the crowds that typically frequent the islands during standard daylight hours.
Scenario 3: The Maritime and Cultural “Life” Shoot
Focusing on the architectural and human elements of the islands’ fishing heritage.
-
Steps: Early morning visits to the Reine or Hamnøy docks; capturing the symmetry of drying stockfish; utilizing macro photography for fishing gear details.
-
Components: Weather-sealed cameras, mid-range zoom lenses, and high-ISO performance.
-
Location: Nusfjord and Å.
-
Relevance: This provides a narrative or “storytelling” aspect to a portfolio, moving beyond pure landscapes to document the cultural identity of the archipelago.
Comparison of Scenarios:
The Aurora Hunt is technique-intensive and requires patience; the Midnight Sun is stamina-intensive; and the Maritime shoot is narrative-intensive. Readers should select based on whether they prioritize celestial phenomena, grand landscapes, or cultural documentation.
Planning, Cost, and Resource Considerations

Planning for a Lofoten tour should begin 6–12 months in advance, as the high-quality lodges (Rorbuer) and the most reputable guides sell out quickly.
| Category | Estimated Amount (USD) | Explanation | Optimization Tips |
| Multi-Day Tour | $3,500 – $6,500 | Includes transport, guiding, and accommodation. | Book “shoulder season” (Oct/Nov) for lower rates. |
| Airfare/Transit | $800 – $1,500 | Flights to Leknes (LKN) or Svolvær (SVJ). | Fly to Harstad/Narvik (EVE) and drive for savings. |
| Specialized Gear | $500 – $2,000 | Arctic clothing, heavy tripods, and filters. | Rent high-end lenses locally if traveling light. |
| Food/Per Diem | $70 – $120 / Day | Norway has a high cost of living for dining. | Use cabins with kitchens to prepare meals. |
Note: Figures are examples based on 2026 market averages and will vary based on the level of luxury and group size.
Strategies, Tools, and Support Options
To be successful in the Best Guided Photography Tours in Norway’s Lofoten Islands, specific tools are necessary to manage the environment.
-
Layering Systems: Utilizing merino wool base layers and GORE-TEX shells. Advantages: Moisture management. Disadvantages: High initial investment.
-
Weather Tracking Apps (Yr.no): The gold standard for Norwegian weather. Advantages: Extremely localized hyper-forecasts. Disadvantages: Requires constant data connection.
-
Lens Heaters: Small USB-powered strips to prevent condensation. Advantages: Essential for long-exposure night shots. Disadvantages: Drains battery life.
-
Lofoten-Specific Map Apps: Identifying hidden trailheads and parking. Advantages: Avoids “over-touristed” spots. Disadvantages: Requires offline map capability.
Safety, Risks, and Common Challenges
The Arctic environment is unforgiving; photographers often place themselves in precarious positions for a “better shot.”
-
Slippery Terrain: Black ice and wet granite are major fall hazards.
-
Prevention: Use “crampons” or micro-spikes on boots; never shoot alone on cliffs.
-
-
Sneaker Waves: Large, unexpected waves on beaches like Vikten.
-
Prevention: Never turn your back on the ocean; keep tripods weighted.
-
-
Battery Failure: Lithium-ion batteries lose 30-50% of their life in the cold.
-
Mitigation: Keep spare batteries in an interior pocket against body heat.
-
-
Road Safety: Narrow roads and “one-way” bridges with heavy tourist traffic.
-
Mitigation: Rely on the professional tour driver to handle all navigation.
-
Best Practices for Field Photography
Ongoing maintenance of both equipment and personal energy is vital during a week-long tour.
-
Gear De-humidification: Moving cameras from sub-zero air to a warm cabin causes instant fogging. Checklist: Place the camera in a sealed plastic bag before entering the cabin.
-
Memory Management: Shoot in “Dual-Slot” mode if possible. Checklist: Back up cards to an external SSD every evening.
-
Physical Pacing: High-latitude light lasts for hours. Checklist: Schedule mandatory nap times during “flat” midday light to remain alert for 2:00 AM aurora displays.
Documentation and Outcome Analysis
Photography tours are documented through the “Selection and Culling” process.
-
The “Hero Shot” Journal: Recording the settings (ISO, Aperture, Shutter) for successful captures to replicate them in similar light.
-
Metadata Archiving: Using GPS-enabled cameras to tag the exact coordinates of unique compositions.
-
Example 1: “Hamnøy Bridge; 15 seconds; f/8; ISO 100; utilized 6-stop ND filter for water smoothing.”
-
Example 2: “Skagsanden Aurora; 4 seconds; f/2.8; ISO 3200; tracked light movement via Yr.no cloud map.”
Closing Summary
The Best Guided Photography Tours in Norway’s Lofoten Islands provide the specialized infrastructure necessary to translate the archipelago’s raw beauty into a high-end portfolio. Success in this region depends on seasonal alignment—choosing between the aurora-rich winter or the golden-hued Midnight Sun—and a rigorous approach to safety and gear management. By prioritizing professional guiding over solo exploration, photographers can navigate the volatile Arctic environment to capture the rare light that defines this Norwegian wilderness.
FAQ
1. Is a specialized photography tour better than a standard tour?
Yes. Standard tours follow a fixed daytime schedule, whereas photography tours are “light-driven,” moving according to weather and sun position.
2. Do I need professional-grade gear?
While a guide can help you with any camera, a mirrorless or DSLR with manual settings and a sturdy tripod are considered the minimum standard for Arctic night photography.
3. When is the best month for both snow and Northern Lights?
Late February to early March is typically considered the optimal window, offering longer daylight for landscapes, deep snow coverage, and dark enough nights for the aurora.